Every company pays its suppliers. If the pipe of invoices is long, it might be tricky to manage payments efficiently. Modern software can make this process much more efficient and accurate. This post is about accounts payable. I’ll show you how accounts payable can be managed in Dynamics 365 for Finance and Operations (D365FO).
Most functions described in this post are also applicable to Dynamics AX 2012 (AX2012).
Contents
Invoicing and due date
How to book payables
There are a few different journals/documents in the system you can use to book payables. Among those options are invoice journals, invoice registers, vendor invoices, and general journals. All of these invoices/ journals/ registers are generally named as source documents.
When a source document is posted, the system records payables in vendor transactions and the ledger. Vendor transactions are considered as module transactions and based on the module transactions the system creates ledger entries.
Due date calculation
The most important thing about liability is its due date. The due date of the liability indicates the date before which the liability must be paid. The system uses the due date for proposing that payments can proceed. A due date is a key instrument for an accounts payable specialist to be able to plan and execute payments.
The system calculates a due date based on the specified settings. I’ll cover most of them in this chapter.
Terms of payment
For calculating a due date, the system uses the value in the “Invoice date” field and takes information from the “Terms of payment” which is linked to the source document. If it’s necessary, the calculated due date can be adjusted manually.
The terms of payment are also specified for the vendor and copied to the source document when the vendor is selected.

The system offers many options for calculating the due date which must be specified in the terms of payment.
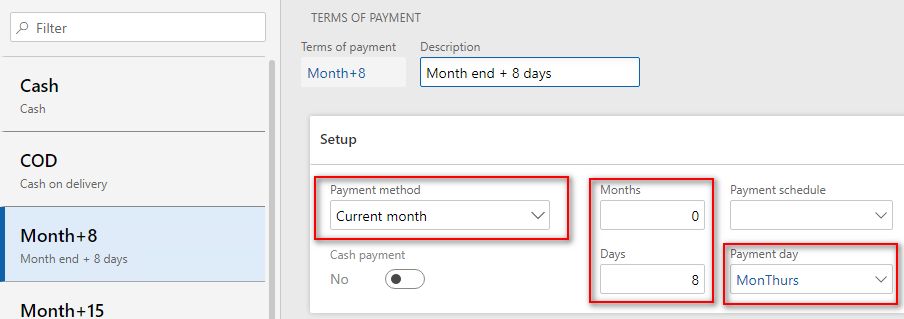
The key field in the “Terms of payment” page is the “Payment method.” The value in the field defines how to calculate the due date of the invoice. The “Net” value of the field means that the system uses the date of the invoice as a due date, and the “Current month” value means that the system takes the last date of the month, specified in the invoice date. The “COD” value stands for “Cash on delivery.”
There are additionally two fields where you can specify the number of days or months which are added to a due date. The fields are “Months” and “Days.” For example, the due date of the invoice must be the 15th of the next month. In this case you need to set “Current month” in the “Payment method” field and input “15” in the “Days” field.
The documentation about terms of payment is in the link.
Payment days
The system allows you to specify a company’s payment days. This setting increases the accuracy of the due date calculation. If the due date is defined as NOT a payment date, the system will change it to the next payment day. Payment days link to the terms of payment.

For example, if the calculated due date is January 15 and the payment days are January 14 and 17, then the system sets January 17 as a due date.
Payment calendar
D365 has an option to set up a payment calendar (don’t confuse this with payment days). The payment calendar contains information about non-business days – days where payments cannot be processed because of unavailability of bank services. The payment calendar is used for adjusting a due date if the due date is a holiday.
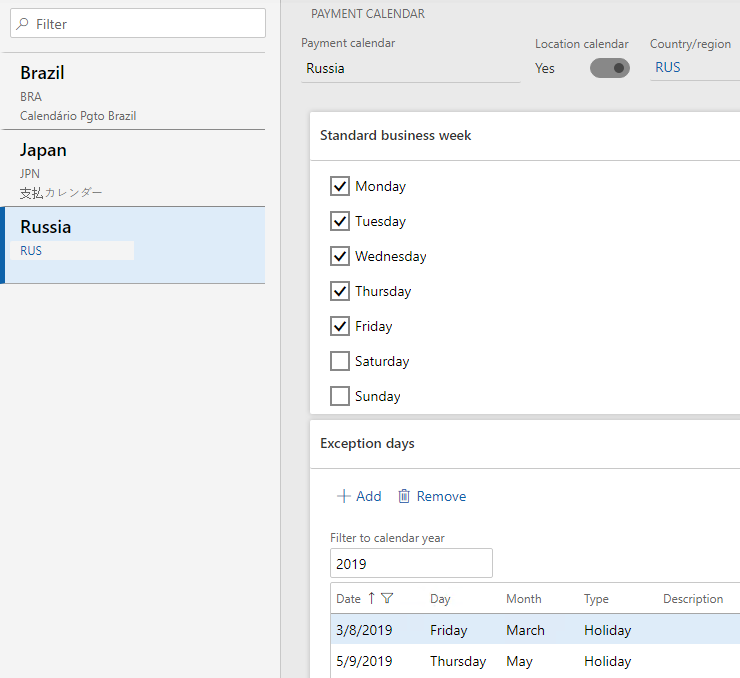
The figure above shows how I specified a payment calendar for Russia. I set Monday-Friday as standard payment days and specified that March 8 and May 9, 2019 are holidays.
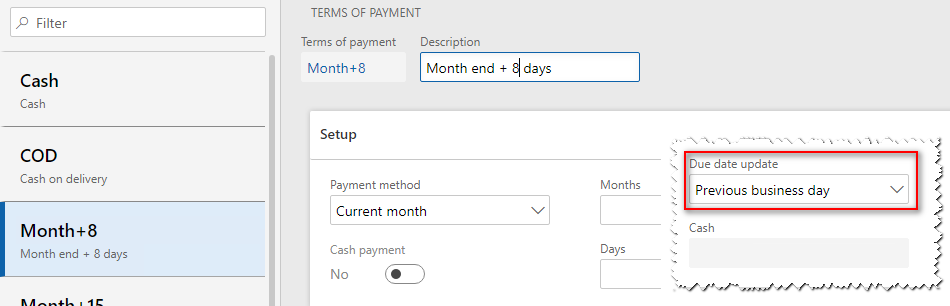
After that it is necessary to define payment calendar rules. You can see the example in the figure below.

I also specified in the terms of payment that the due date must be updated to the previous business day if the calculated due date is NOT a business day.
For instance, in accordance with the vendor agreement, the invoice must be paid on the 8th of the following month. A user enters the invoice dated February 28, 2019 into the system. In this case the system calculates the due date as March 7 because according to the payment calendar March 8 is a holiday and the terms of payment specify the previous business day for payment.
Due date in the invoice journal
A due date is calculated in every source document which can be used to book a liability. In the case where an invoice journal is used, the due date is calculated in a journal line. Let’s have a look at it.
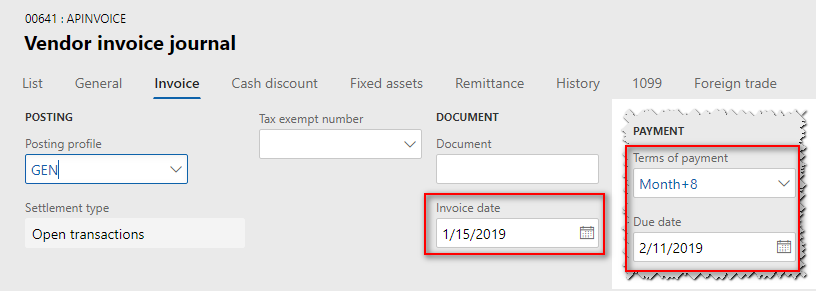
The due date for the journal line is calculated based on the invoice date and the terms of payment. The system also takes into account payment days and the payment calendar.
Payment schedule
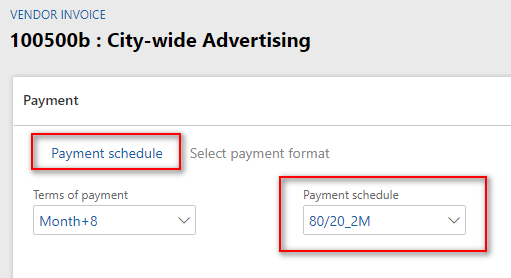
The system offers an option to set a schedule of payments. You can use a payment schedule if the invoice has to be paid in a few payments; for example, if the first payment is 70% and the second 30%. To resolve this requirement the payment schedule must be set up and linked to the terms of payment.

The link to the payment schedule is transferred from the terms of payment to the vendor when the terms of payment is selected in the vendor page.

The link to the schedule is transferred from the vendor to the source document when the vendor is selected there. An example of a vendor invoice is in the image below.
The system allows changes in the invoice schedule. The “Payment schedule” link leads to the “Payment schedule” page where schedule for the invoice is shown. In this schedule, there are exact dates and amounts presented. The image below is the schedule for the $1,000 invoice.

It’s possible to adjust this invoice payment schedule.
Payment schedule functionality is not available in invoice journals and registers.
Vendor transactions
When a source document is posted, the system creates vendor transactions. These transactions can be referred as accounts payable module transactions, or just module transactions. Let’s have a look at them.
The “Vendor transactions” page shows all vendor module transactions that influence the balance of the vendor. Invoice and payment transactions are the main entries there. The key fields on the page are the following:
- Voucher – serves as a link of vendor and ledger transactions.
- Date – the date when the operation is accounted.
- Invoice – the number of the invoice linked to the transaction. For payment transactions, this field is empty.
- Amount – the amount of the transaction in the currency of the legal entity.
- Balance – the open balance of the transaction. Zero balance of the invoice transaction means that the invoice is settled with a payment. The same is true for the zero balance of the payment transaction meaning that the payment is settled with an invoice.
The page also has information about amounts and balances in the transaction currency — the currency which was used in the source document — and in the reporting currency. More about reporting currency can be found in the link.
The “Vendor transaction” page doesn’t have information about a due date for the invoice. This is because many payments can be scheduled for the exact invoice. As we discussed above, “Payment schedule” is used to accomplish this task.
To find out the due dates of the invoice, you need to select an invoice transaction on the “Vendor transactions” page and click the “Open details” button. Please note that the invoice transaction must have an open balance, otherwise the system doesn’t show any rows in the “Open transactions” page. On this “Open transactions” page, you can find a due date and the due date can be changed there.
The system has a page where all open transactions are available. The page is named, “Open vendor invoices.” It’s possible to export these transactions and analyse payables in Excel.

Ledger entries
The system posts ledger transactions based on the vendor transactions. Ledger and vendor transactions are linked via a voucher. You can find ledger transactions linked to the vendor transactions by clicking the “Voucher” button on the “Vendor transactions” page.
To define a ledger account where liability must be posted, the system uses a posting profile which is linked to the source document. Here is an example of an invoice journal line below.
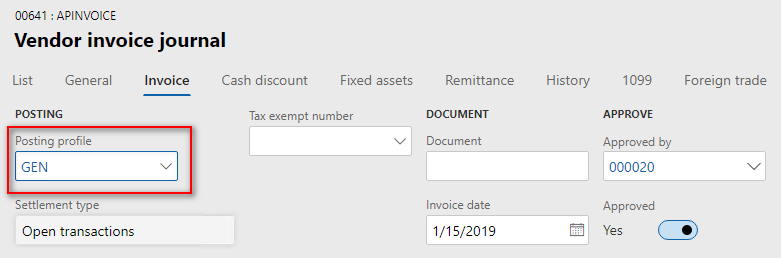
To define a profile for the source document, in general cases the system uses “accounts payable” parameters. The image below shows a posting profile parameter which is used to post liability.

A posting profile allows a ledger account to be specified for all vendors, for vendor groups, or for individual vendors.

You can find more information about posting profiles in the link.
Payments
The most straightforward payment process comprises the following steps:
- Create a payment journal.
- Create a payment proposal.
- Transfer payments from the proposal to the journal.
- Print checks or create a file for the bank.
- Send checks to the vendors or upload the file to the bank software.
- Post the payment journal.
- Reconcile a bank statement.
Let’s have a look at the details of some of the steps of this process.
Payment proposals
First, we need to create a payment journal, go to its lines, and create a proposal.

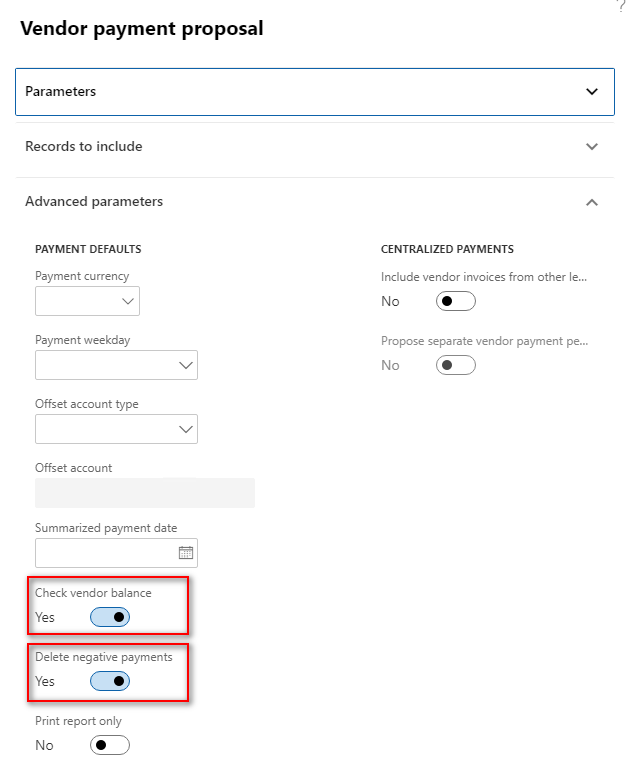
The payment proposal functionality fetches open transactions for payment. To fetch the data, there are a few options available in the “Select invoice by” field, but the most frequently used criterion is the due date. For limiting the transactions by the due date, set the appropriate value in the “Select invoice by” field and a date in the “To date” field.
For removing all prepayments and getting only payment proposals, set the “Delete negative payments” field to “Yes.” And to get only vendors where the net balance is liability, set the “Check vendor balance” field to “Yes.”
The list of proposed payments includes all open transactions which meet the conditions. Now your goal is to review the proposed payments and adjust or remove payments as necessary.

The system has the “Balance control” page that you can use to make sure that there is a sufficient amount in the bank accounts to cover all proposed payments.
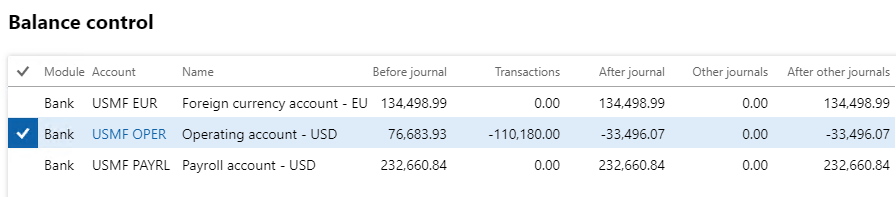
You probably noticed the “Bank account” column in the “Vendor payment proposal” page. This field gets its values from the vendor transaction (the field “Company” on the “Payment” tab of the “Vendor transaction” page). However, the balance control doesn’t take this column into account. For showing bank accounts on the “Balance control” page, the system takes them from the methods of payment, which are linked to the vendor transaction.
In case the company has a few bank accounts that can be used to pay, and the balance control shows that the distribution of payments isn’t appropriate, it’s possible to change the distribution of payments among the bank accounts. To do so, use the “Payment distribution” button on the “Vendor payment proposal” page. By clicking the button, the system shows the “Payment distribution” form. You can set the priority in of the bank account there.

When the “OK” button is clicked, the system allocates payments among bank accounts by changing the method of payment in the vendor transaction. If there is not enough money to pay, the system searches another method of payment where the export format class name is the same as in the changing method of payment.
You can find more about payment distribution in the post. The post is for AX 2012 but is still relevant to D365FO. More about payment proposal functionality can be found in the documentation.
When all payments are defined, it’s time to create payment journal lines.
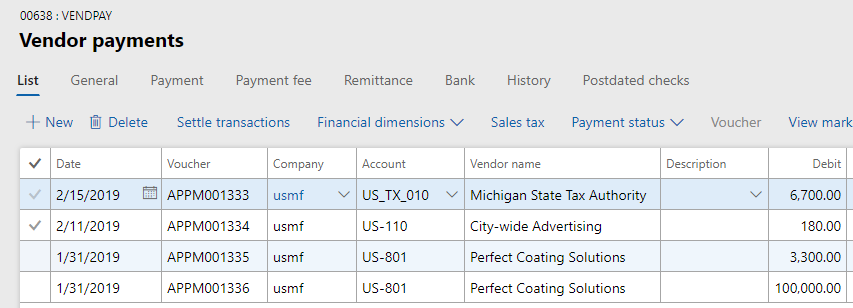
While creating payment journal lines, the system groups the open transactions depending on the setting on the method of payment.

In case the “Total” value is set in the “Period” field, the system groups all open transactions for the vendor and method of payment into a single payment line.
All created payment lines are marked for settlement with the open transactions that were used for creating the line.

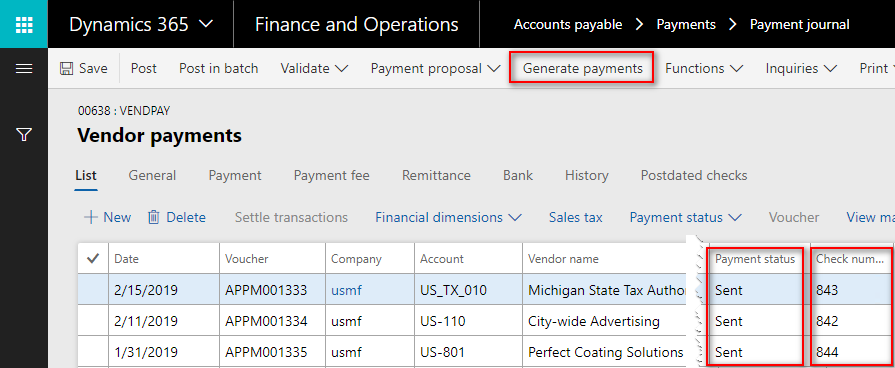
Generating payments
When the lines in the payment journal are ready, the next step is to generate payments. This means that checks can be printed or, in case of electronic payment, a file for the bank can be prepared. The “Generate payments” button in the “Vendor payments” page is used to start generating the payments. When the generating is done, the payment status is changed to “Sent.” If checks are used, the system also generates check numbers.
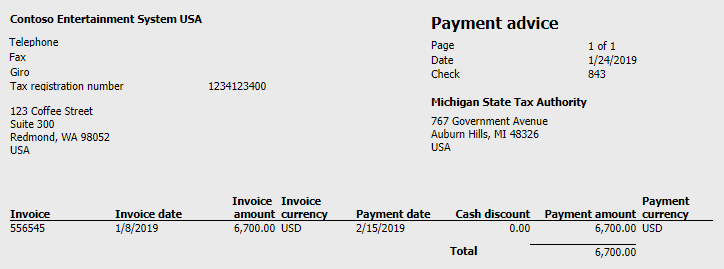
When payments are generated, it’s possible to print the “Payment advice” report which is used to inform vendors about processed payments.
Payment journal posting
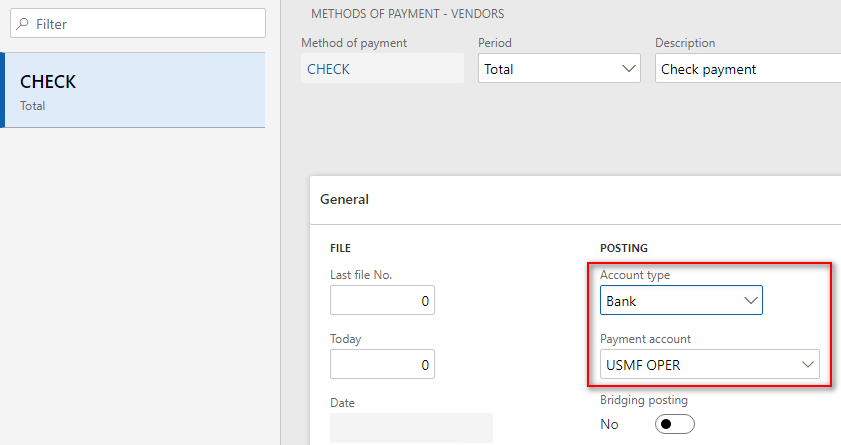
When the bank processed payments or checks were printed and sent, the payment journal can be posted. However, to post the journal line, the line must meet the conditions specified in the method of payment which is linked to the line. Among those conditions are payment status and payment control.
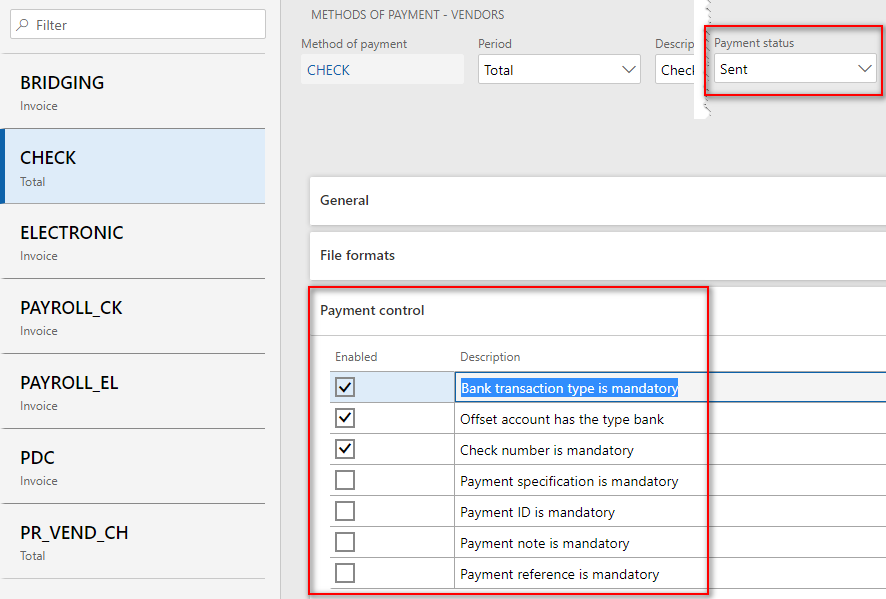
It can be a good idea to check payment status before posting a journal. For example, for the “CHECK” payment method the payment status must be “Sent” because this status appears after the printing of checks. It’s also a good idea to check that the check number is filled and the offset account is the type bank.
While posting, the system creates vendor payment transactions and settles them with marked invoices. The system also creates bank transactions. Based on the vendor and bank transactions, the system creates ledger entries. All of these transactions share the same number of vouchers. You can find ledger entries by clicking the “Voucher” button in the vendor payments journal.
To debit liability, the system uses the account in the posting profile which is linked to the line of the payment journal.

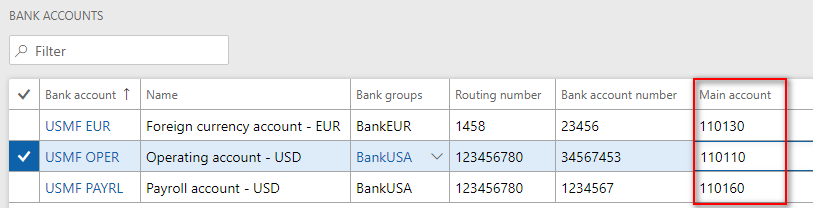
To define a bank ledger account the system uses an account specified on the bank account page.
Options to manage payables
Due date and schedule
The system allows you to change a due date when the invoice is already posted. It is possible to do that in the “Open transactions” page.
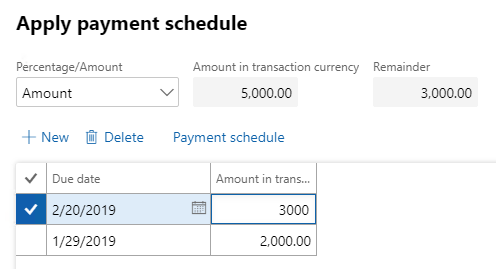
It is also possible to divide an open transaction line by applying the payment schedule. To do this you need to go to the “Settle transactions” page, mark an open transaction line, and click the “Apply payment schedule” button. The system shows the “Apply payment schedule” form where you can create a schedule from scratch or by applying a predefined schedule.
D365FO has an option to postpone a payment. The “Invoice payment release date” field is used for this. This field is available in the invoice journal lines and invoice register lines, and in a vendor invoice. The value from this field is transferred to the vendor transactions when the source document is posted.
Automatic settlement
D365FO can settle open transactions automatically. For example, in the system there is an open invoice transaction. You created a payment but omitted to mark it. When the payment is posted, the system automatically settles the payment and the open invoice.
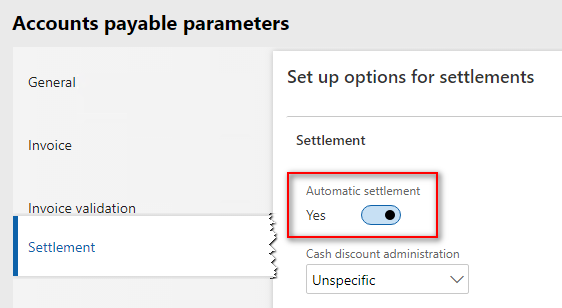
To make things work, the “Automatic settlement” parameter in the payable parameters must be set to “Yes.”
Also, the “Allow automatic settlement” parameter in the appropriate posting profile must be set to “Yes.”
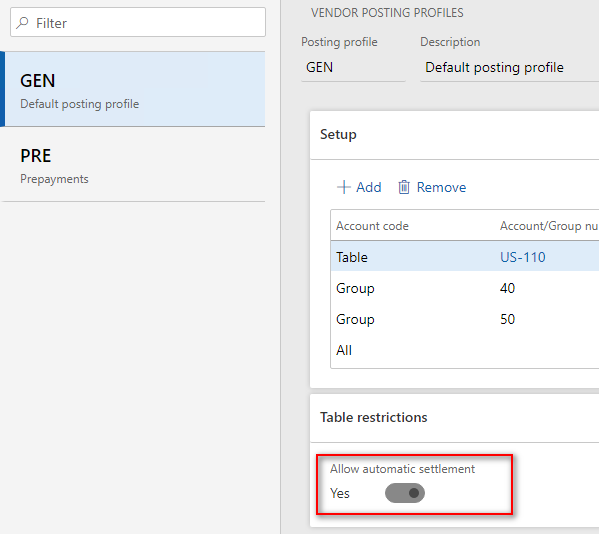
The payable parameters have overriding functionality. It means that if automatic settlement is off in the payable parameters, then the functionality will not work even though it is on in the profile.
Amount from a settlement
The system offers an option to specify an amount in a line of the invoice or payment journal from the settlement form. To do this, create a line in the journal, specify a vendor, and then go to the settlement form. In the form, mark the lines you need. Then click the “OK” button and the system transfers the amounts from the marked lines.
Settle remainder
In the latest version of D365FO for the moment that I’m writing this post (v8.1.3), a new function was introduced. This function allows you to eliminate a remainder of a payment settlement.
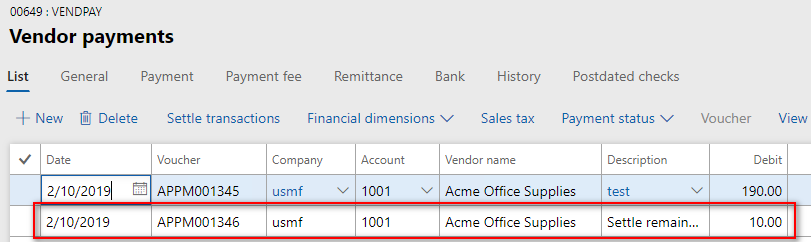
For instance, you’re creating a vendor payment in the payment journal for the exact amount. While marking the payment and invoice you find that the payment amount is less than the invoice amount. You’re totally sure that the invoice will not be paid in full and that is why it can be necessary to settle the remainder of the invoice. In this case, the “Settle remainder” function can be very handy.

The “Accounts payable > Payments > Payment journal” menu item, the “Lines” button, then the “Settle transactions” button.
As an outcome of the function, the system creates a new line in the payment journal. This line settles the remainder of the invoice.
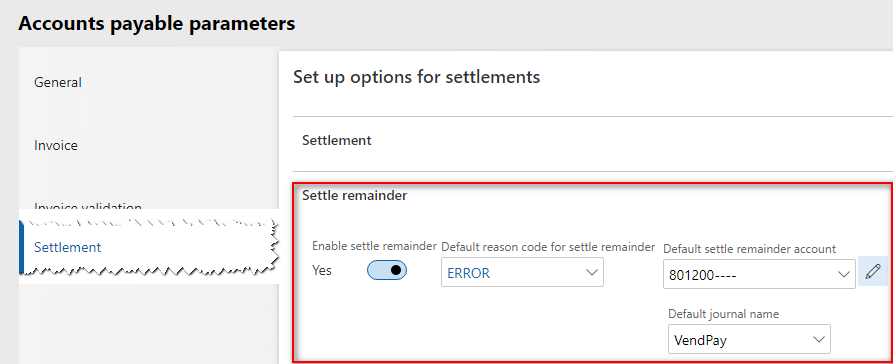
For activating the “Settle remainder” functionality, you need to go the “Accounts payable parameters” and set it there.
More about this function can be found in the blog or documentation.
Find out about marked transactions
There can be a situation when open transactions are already marked with journal lines. Let’s say you open the settlement form from a payment journal and see a special pictogram in the line you need. When you try to mark this line, the system shows the message, “This transaction has been marked for settlement by another user.”
To find the source document which is marked with the open transactions you need, focus on that transaction, go to the “Specification” form, and try changing a value in the “View” field until you see lines in the overview.
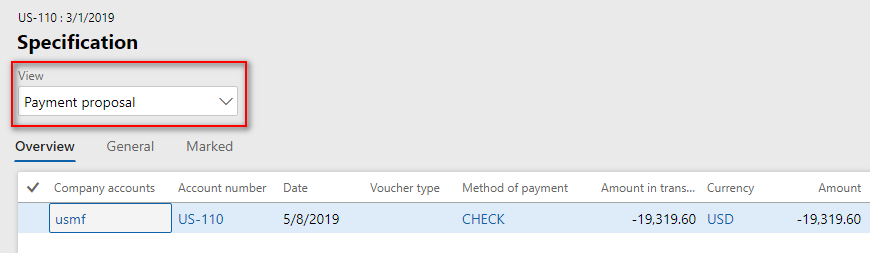
The example above shows that the open transaction is marked with a payment proposal, meaning that there is a payment proposal created in the system that is not transformed to the journal line yet. To define for which journal the payment proposal is created, have a look at the “Journal batch number” field on the “General” tab. To delete payment proposals, go to that journal and run the “Payment proposal / Create payment proposal” function there, and then click the “Cancel” button in the vendor proposal form.
You can notice that the amount of the open transactions in the “Settle transaction” form are different from the amount in the payment proposal. That is because a payment proposal can be marked with many open transactions. All marked transactions with the proposal can be found on the “Marked” tab.
Payables reconciliation and reports
D365FO has many reports related to accounts payable. In this post I cover the most interesting: vendor aging report and vendor to ledger reconciliation report.
Vendor aging report
From the point of view of analysis and planning, the most interesting report is the vendor aging report. This report allows you to get information on forward and overdue payables.
Let’s say today is February 10, 2019 and you need to find out which payments are due in the next four days. In this case you need to run the report with the parameters, as shown below.
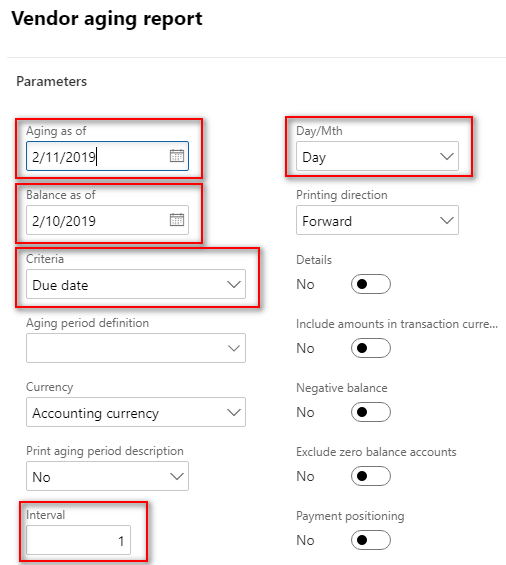
The report shows what has to be paid on February 11 and 13.

As you can see, the report also shows liability due before February 11. Let’s see how these arrears had to be paid in the past. We will look at the grouping of arrears into 7 day blocks beginning February 10.
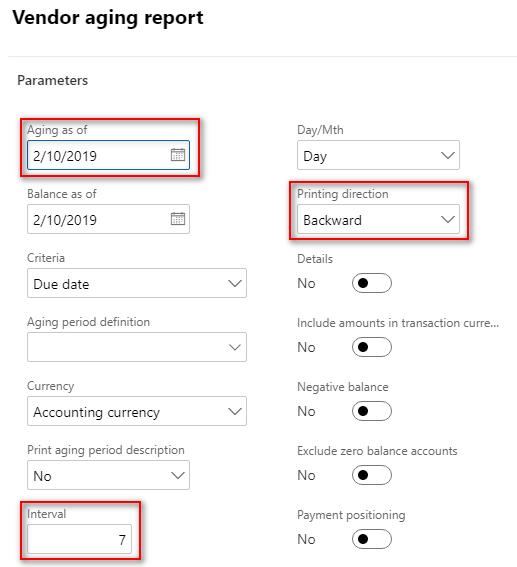
The “Accounts payable > Inquiries and reports > Vendor aging report” menu item.
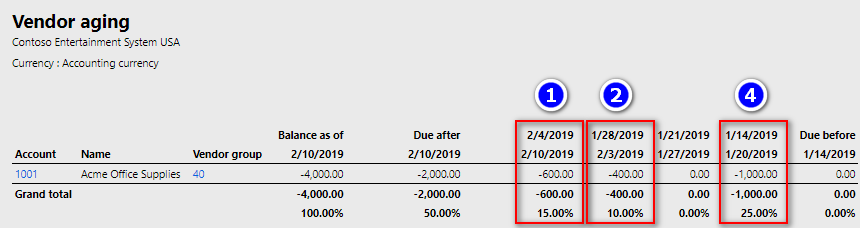
In this scenario, the report shows that the company has overdue payments for weeks 1, 2, and 4.
Vendor to ledger reconciliation
As mentioned above, the system creates module transactions first and then creates ledger entries based on the module transactions. This could lead to differences between module and ledger amounts, for many causes. For example, a user could accidentally post directly on the ledger account which is linked to the “accounts payable” module transactions. As a result, the system would create a ledger entry without any module transaction.
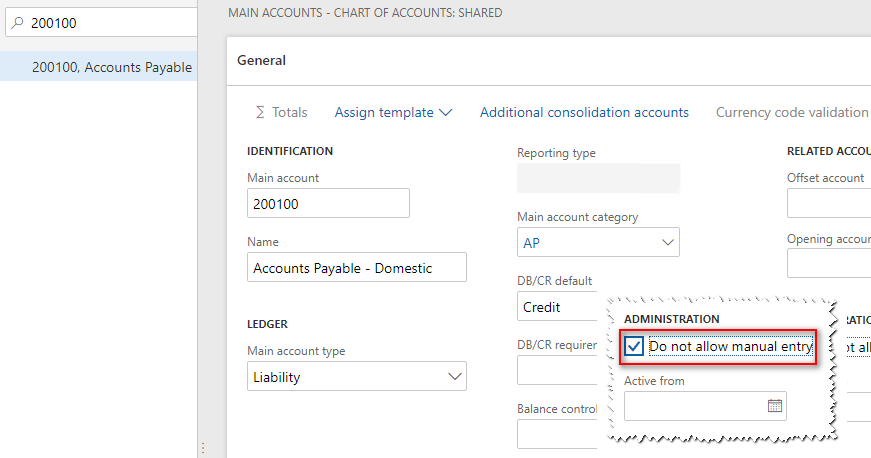
Let’s say the 200100 ledger account is specified in a vendor posting profile. If this account is used as shown in the image below, it would lead to differences between module and ledger data.

As a result, the system shows different amounts in the ledger and module reports: as an example, balances in the vendor aging reports (module report) don’t match balances in the trial balance (ledger report).
D365FO has an option to block manual entries in the ledger. It can be a good idea to activate this option in all accounts which are linked to modules.
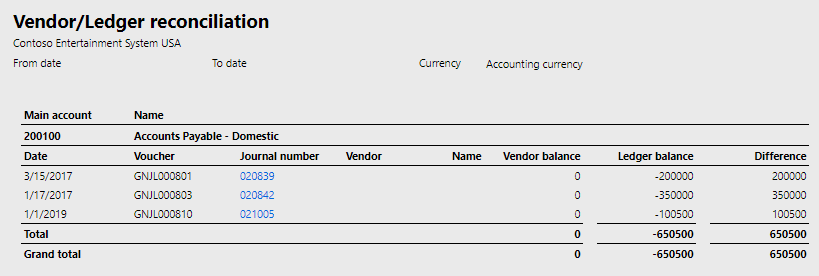
The system also has a control if there are any differences between the vendor module and ledger amounts. The report is designed to compare data for a period. If you run the report with the parameters as in the image below, the report takes all ledger accounts from the vendor profiles, then fetches all ledger entries for these accounts, and then compares these entries with vendor transactions.
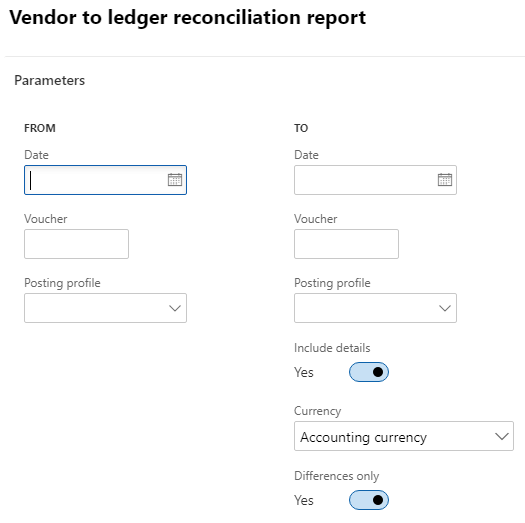
As the “Include details” parameter is on, the report shows a difference for every voucher.
In this blog post I have covered the core functionality regarding accounts payable. I hope you found it valuable.
Please feel free to share your thoughts about the topic in comments.
Thanks for reading!

This is a very detailed blog! Well-written. Thank you for the content!
Hi Tin, Thank you for the feedback!
Thanks Vadim Vdovin to provide details information about vendor transactions and payments process
and the way of explain is very good
Thank you for the feedback.
I’m happy that it helps!
Thanks! Was looking for AR Automatic Settlement process and found AP here.
Your instructions are very detailed.
Thanks, it’s very helpful to all.detailed explanation.
Very clear. Thanks for your blog!